통신 프레임워크 설명
이 장에서 중요하게 살펴볼 부분은 통신 프레임 워크의 구현 원리입니다. 이론적인 부분이 비교적 많습니다. 처음에는 통신 모델에 대한 대략적인 개요에 대해 이해하고, 제공되는 예제를 직접 수행해 본 후 다시 돌아와 원리를 이해해 보겠습니다. 이러한 과정을 거치고 실제 수행을 하다보면 원하는 방식으로 프로토콜을 정의하고 사용할 수 있을 것입니다.
프레임

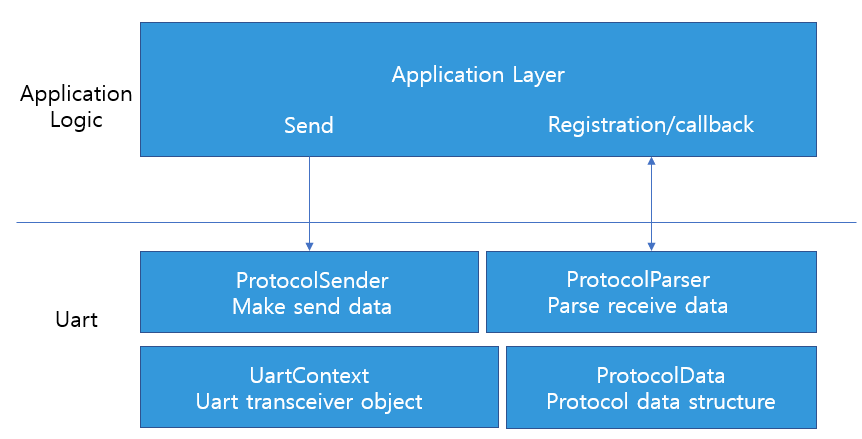
소프트웨어 APP 부분은 두 개의 계층으로 나뉩니다.
- UART - 프로토콜 분석 및 캡슐화, 시리얼 포트 HAL 계층
- UartContext:시리얼 포트 컨트롤, 송수신 인터페이스를 제공하는 시리얼 포트의 물리적 제어 계층
- ProtocolData:통신 프로토콜에서 변환 된 실제 변수를 저장하는 데 사용되는 통신 데이터 구조 정의
- ProtocolSender:데이터를 캡슐화하여 전송
- ProtocolParser:데이터의 프로토콜 분석을 완료 한 후 분석 된 데이터를 ProtocolData의 데이터 구조체에 저장하는 동시에 어플리케이션이 시리얼 데이터 변경을 모니터링 할 수 있도록 콜백 인터페이스를 관리합니다.
- APP - 어플리케이션 인터페이스 계층
- ProtocolParser에서 제공하는 인터페이스를 통해 수신 및 모니터링 할 시리얼 포트 데이터를 등록하여 시리얼 포트의 업데이트 된 ProtocolData를 얻습니다.
- ProtocolSender에서 제공하는 인터페이스를 통해 MCU에 명령 정보 전송
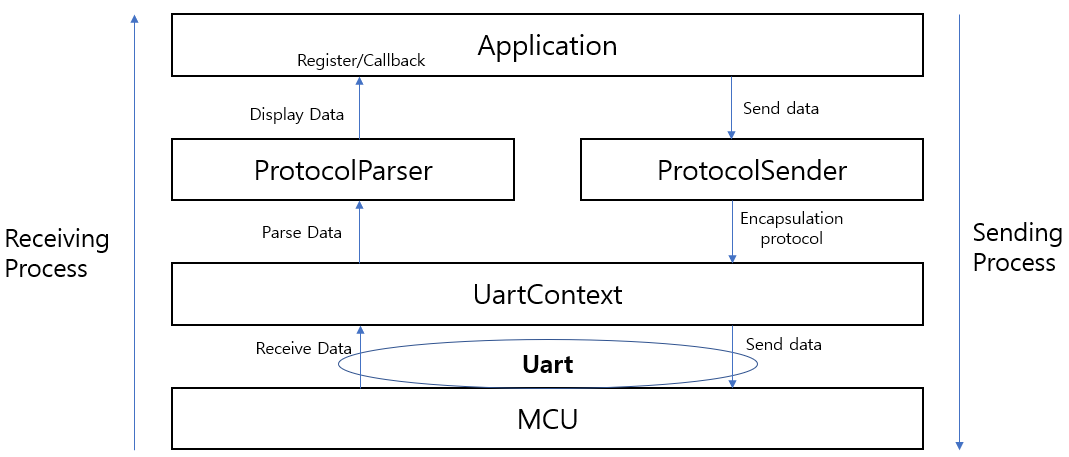
이 과정을 재-정의해 보겠습니다 :

receive 및 send 두 프로세스가 위아래로 진행되고 각 레이어의 기능이 비교적 명확하다는 것을 알 수 있습니다.
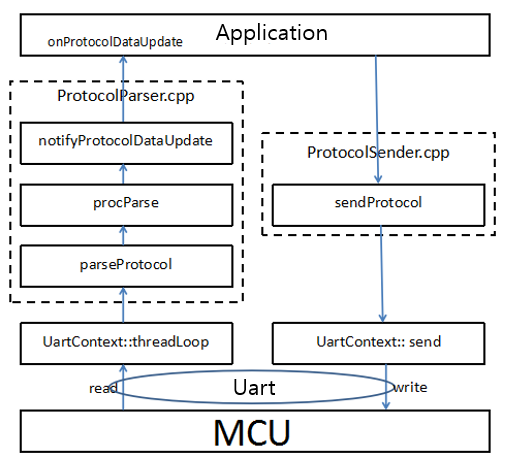
실제 코드에 해당하는 구체적인 과정은 다음과 같습니다.

수신 또는 송신 프로세스에 관계없이 시리얼 포트에 대한 최종 읽기 및 쓰기 작업은 UartContext를 통해 이루어집니다. 이것은 표준화 된 프로세스이므로 일반적으로 UartContext를 수정할 필요가 없습니다. 물론 필요한 경우에 수정할 수 있습니다.
이 시점에서 우리는 이 통신 모델에 대한 일반적인 이해를 가지고 있을 것이고, 이후 구체적인 코드의 구현을 살펴볼 것입니다.
프로토콜 수신부 사용 및 수정 방법
통신 프로토콜 형식 수정
여기서는 보다 일반적인 통신 프로토콜의 예를 제공합니다.
| frame header(2bytes) | command(2bytes) | length of data(1byte) | command data(N) | verification(1byte, option) |
|---|---|---|---|---|
| 0xFF55 | Cmd | len | data | checksum |
CommDef.h 파일은 동기화 프레임 헤더 정보와 최소 데이터 패킷 크기 정보를 정의합니다.
// When you need to print the protocol data, open the following macro
//#define DEBUG_PRO_DATA

// Support checksum verification, open the following macro
//#define PRO_SUPPORT_CHECK_SUM

/* SynchFrame CmdID  DataLen Data CheckSum (Option) */
/*     2Byte  2Byte   1Byte    N Byte  1Byte */
// Minimum length with CheckSum: 2 + 2 + 1 + 1 = 6
// Minimum length without CheckSum: 2 + 2 + 1 = 5

#ifdef PRO_SUPPORT_CHECK_SUM
#define DATA_PACKAGE_MIN_LEN        6
#else
#define DATA_PACKAGE_MIN_LEN        5
#endif

// Sync frame header
#define CMD_HEAD1    0xFF
#define CMD_HEAD2    0x55
ProtocolParser.cpp파일
/**
 * Function: Analyze protocol
 * Parameters: pData - protocol data, len - data length
 * Return value: the length of the actual protocol
 */
int parseProtocol(const BYTE *pData, UINT len) {
    UINT remainLen = len;    // Remaining data length
    UINT dataLen;    // Packet length
    UINT frameLen;    // Frame length

    /**
     * The following parts need to be modified according to the protocol format to parse out the data of each frame
     */
    while (remainLen >= DATA_PACKAGE_MIN_LEN) {
        // Find the data header of a frame
        while ((remainLen >= 2) && ((pData[0] != CMD_HEAD1) || (pData[1] != CMD_HEAD2))) {
            pData++;
            remainLen--;
            continue;
        }

        if (remainLen < DATA_PACKAGE_MIN_LEN) {
            break;
        }

        dataLen = pData[4];
        frameLen = dataLen + DATA_PACKAGE_MIN_LEN;
        if (frameLen > remainLen) {
            // Incomplete data frame
            break;
        }

        // To print a frame of data, open the DEBUG_PRO_DATA macro in the CommDef.h file when needed
#ifdef DEBUG_PRO_DATA
        for (int i = 0; i < frameLen; ++i) {
            LOGD("%x ", pData[i]);
        }
        LOGD("\n");
#endif

        // Support checksum verification, open PRO_SUPPORT_CHECK_SUM macro in CommDef.h file when needed
#ifdef PRO_SUPPORT_CHECK_SUM
        if (getCheckSum(pData, frameLen - 1) == pData[frameLen - 1]) {
            // Parse a frame of data
            procParse(pData, frameLen);
        } else {
            LOGE("CheckSum error!!!!!!\n");
        }
#else
        // Parse a frame of data
        procParse(pData, frameLen);
#endif

        pData += frameLen;
        remainLen -= frameLen;
    }

    return len - remainLen;
}
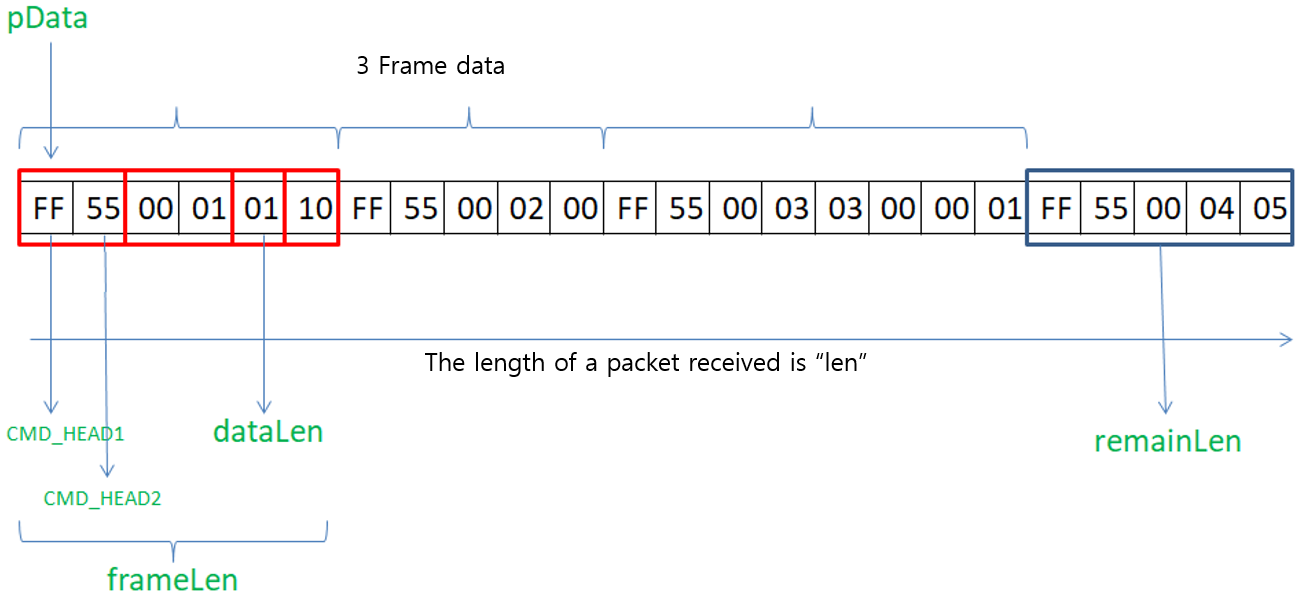
위의 분석 과정은 약간 복잡합니다. 먼저 아래 그림을 본 후 분석하면 이해하기 더 쉬울 것입니다. 데이터 패킷은 0개 또는 여러 개의 프레임 데이터를 포함 할 수 있습니다. 아래 그림에서는 3개의 프레임 데이터를 찾을 수 있습니다. 그리고 아직 데이터가 5byte 부족한 불완전한 데이터 프레임도 볼 수 있습니다. 이 불완전한 데이터 프레임은 다음 데이터 패킷에 이어지게 됩니다.

프로토콜 헤더를 수정
 // 1.Modify the definition of the protocol header. If the length of the protocol header changes, pay attention to modifying the
 // statement of the protocol header judgment part.
 #define CMD_HEAD1    0xFF
 #define CMD_HEAD2    0x55

 // 2.You need to modify this when the length of the protocol header changes.
 while ((mDataBufLen >= 2) && ((pData[0] != CMD_HEAD1) || (pData[1] != CMD_HEAD2)))
프로토콜 길이 위치 변경 또는 길이 계산 방법 수정
 // Here pData[4] represents the fifth data is the length byte, if it changes, please modify it here.
 dataLen = pData[4];
 // The frame length is generally the data length plus the head and tail length. If the length calculation method passed in the
 // agreement changes, modify this part.
 frameLen = dataLen + DATA_PACKAGE_MIN_LEN;
프로토콜 검증 방법이 변경되는 경우
 /**
  * By default, we turn off checksum verification. If you need to support checksum verification, open the PRO_SUPPORT_CHECK_SUM
  * macro in the CommDef.h file
  * When the verification is different, the verification method needs to be modified.
  * 1.Check the content changes to modify this location
  *     if (getCheckSum(pData, frameLen - 1) == pData[frameLen - 1])
  * 2.Check the calculation formula changes to modify the content in the getCheckSum function
  */

 /**
  * Get checksum code
  */
 BYTE getCheckSum(const BYTE *pData, int len) {
     int sum = 0;
     for (int i = 0; i < len; ++i) {
         sum += pData[i];
     }
     return (BYTE) (~sum + 1);
 }
데이터 프레임 수신이 완료되면 프로그램은 procParse를 호출하여 분석합니다.
 // Support checksum verification, open PRO_SUPPORT_CHECK_SUM macro in CommDef.h file when needed
 #ifdef PRO_SUPPORT_CHECK_SUM
 // Get checksum code
 if (getCheckSum(pData, frameLen - 1) == pData[frameLen - 1]) {
      // Parse a frame of data
      procParse(pData, frameLen);
 } else {
      LOGE("CheckSum error!!!!!!\n");
 }
 #else
 // Parse a frame of data
 procParse(pData, frameLen);
 #endif
통신 프로토콜 데이터를 UI컨트롤과 연결하는 방법
이전 프로토콜 프레임워크를 계속하여 procParse의 구문 분석 부분에 들어갑니다.
키 코드는 여기에 있습니다 : ProtocolParser.cpp
파일을 열고 void procParse (const BYTE * pData, UINT len)를 찾습니다.
/*
 * Protocol analysis
 * Input parameters :
 *     pData: Start address of a frame of data
 *     len: Length of frame data
 */
void procParse(const BYTE *pData, UINT len) {
    /*
     * Parse the Cmd value to obtain the data and assign it to the sProtocolData structure
     */
    switch (MAKEWORD(pData[2], pData[3])) {
    case CMDID_POWER:
        sProtocolData.power = pData[5];
        LOGD("power status:%d",sProtocolData.power);
        break;
    }
    notifyProtocolDataUpdate(sProtocolData);
}
위의 MAKEWORD (pData [2], pData [3])는 프로토콜 예제에서 Cmd 값을 나타냅니다.
데이터 분석이 완료되면 notifyProtocolDataUpdate를 통해 UI에 업데이트를 알립니다. 이 부분은 아래 UI 업데이트 부분을 참고하시기 바랍니다.
데이터 구조
위의 프로토콜은 sProtocolData구조로 구문 분석되며 sProtocolData는 MCU(또는 기타 장치)의 시리얼 포트에서 보낸 데이터 값을 저장하는 데 사용되는 정적 변수입니다. 이 데이터 구조는 ProtocolData.h 파일에 있습니다. 여기에서 전체 프로젝트에서 사용하는 통신 변수를 추가 할 수 있습니다.typedef struct { // You can add protocol data variables here BYTE power; } SProtocolData;UI 업데이트
IDE가 Activity.cpp를 생성 할 때 UI 액티비티의 registerProtocolDataUpdateListener가 완료됩니다. 이는 데이터가 업데이트될 때 등록된 함수로 데이터를 수신함을 의미합니다.static void onProtocolDataUpdate(const SProtocolData &data) { // Serial data callback interface if (mProtocolData.power != data.power) { mProtocolData.power = data.power; } if (mProtocolData.eRunMode != data.eRunMode) { mProtocolData.eRunMode = data.eRunMode; mbtn_autoPtr->setSelected(mProtocolData.eRunMode == E_RUN_MODE_MANUAL); if (mProtocolData.eRunMode != E_RUN_MODE_MANUAL) { mbtn_external_windPtr->setText(mProtocolData.externalWindSpeedLevel); mbtn_internal_windPtr->setText(mProtocolData.internalWindSpeedLevel); } } ... }코드에는 페이지의 정적 변수 인 mProtocolData변수가 있습니다. onUI_init()중에 초기화됩니다. 예 :
static SProtocolData mProtocolData;
static void onUI_init() {
      //Tips :Add the display code for UI initialization here, example : mText1->setText("123");
      mProtocolData = getProtocolData(); // Initialize the structure of the serial port data.
      //Start the UI display of the initial page
}
시리얼 데이터 전송
ProtocolSender.cpp를 엽니다.
APP계층이 MCU(또는 기타 장치)에 데이터를 보내야하는 경우 sendProtocol을 직접 호출하는 것으로 충분합니다.
특정 프로토콜 캡슐화는 sendProtocol함수에 의해 완료됩니다. 사용자는 자신의 프로토콜 요구 사항에 따라 이 부분의 코드를 수정할 수 있습니다.
/**
 * Need to be spliced according to the protocol format, the following is just a template
 */
bool sendProtocol(const UINT16 cmdID, const BYTE *pData, BYTE len) {
    BYTE dataBuf[256];

    dataBuf[0] = CMD_HEAD1;
    dataBuf[1] = CMD_HEAD2;            // Sync header

    dataBuf[2] = HIBYTE(cmdID);
    dataBuf[3] = LOBYTE(cmdID);        // Command ID

    dataBuf[4] = len;

    UINT frameLen = 5;

    // Data
    for (int i = 0; i < len; ++i) {
        dataBuf[frameLen] = pData[i];
        frameLen++;
    }

#ifdef PRO_SUPPORT_CHECK_SUM
    // checksum
    dataBuf[frameLen] = getCheckSum(dataBuf, frameLen);
    frameLen++;
#endif

    return UARTCONTEXT->send(dataBuf, frameLen);
}
액티비티에서 버튼을 누르면 동작 가능합니다.
BYTE mode[] = { 0x01, 0x02, 0x03, 0x04 };
sendProtocol(0x01, mode, 4);