Communication Case Practice
Through the previous chapter Communication Framework Explanation, what may be seen is also in the cloud. Here we first summarize, serial communication mainly has the following 4 points:
- Receive data
- Parse data
- Display data
- Send data
The parse data part is more complicated and needs to be changed according to the specific communication protocol; in this chapter, we will not talk about the theoretical things, and give some practical cases. You can play it a few times. .
Case 1
Here we still take the previous communication protocol as an example to implement a simple communication program of our own;
For the complete code, see the UartDemo project in Sample Code;
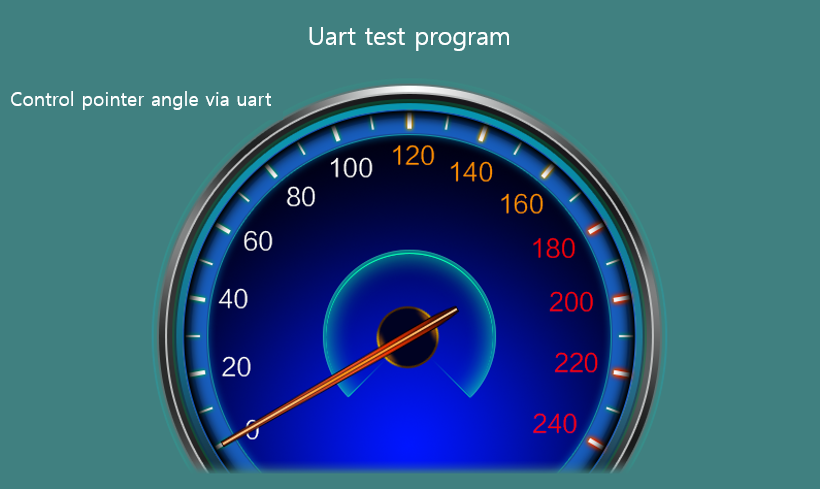
The final effect we want to implement is to send instructions through the serial port to control the rotation of the meter pointer on the display. The UI rendering is as follows:

We only need to modify 3 places to control the rotation of the instrument pointer;
1) Revisit the protocol format introduced earlier, here we add our own protocol command CMDID_ANGLE corresponding to the value 0x0001 :
| Protocol header(2bytes) | Command(2bytes) | length of data(1byte) | data(N) | checksum(1byte option) |
|---|---|---|---|---|
| 0xFF55 | 0x0001(See belowCMDID_ANGLE) |
1 | angle | checksum |
We add 1 variable to the protocol data structure, see ProtocolData.h:
/******************** CmdID ***********************/
#define CMDID_POWER            0x0
#define CMDID_ANGLE            0x1    // new command ID
/**************************************************/

typedef struct {
    BYTE power;
    BYTE angle;    // Added variable to save pointer angle value
} SProtocolData;
2) Since we are still using the previously defined protocol format, we do not need to make any changes to the protocol parsing part here, just process the corresponding CmdID value in procParse:
/**
 * Parse each frame of data
 */
static void procParse(const BYTE *pData, UINT len) {
    // CmdID
    switch (MAKEWORD(pData[3], pData[2])) {
    case CMDID_POWER:
        sProtocolData.power = pData[5];
        break;

    case CMDID_ANGLE:    // New part, save angle value
        sProtocolData.angle = pData[5];
        break;
    }

    // Notify protocol data update
    notifyProtocolDataUpdate(sProtocolData);
}
3) Let's look at the callback function of the activity receiving protocol data, see logic/mainLogic.cc :
static void onProtocolDataUpdate(const SProtocolData &data) {
    // Serial data callback function

    // Set the rotation angle of the pointer
    mPointer1Ptr->setTargetAngle(data.angle);
}
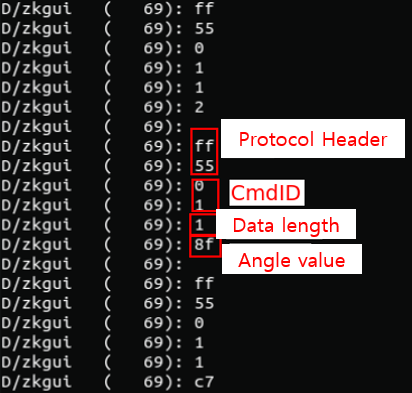
After completing the above process, we only need to send the corresponding instructions to the screen through the MCU to see the rotation of the indicator pointer; for simplicity, we do not use checksum verification in this program, and the protocol data is as follows :
protocol header     CmdID     length of data    angle data
0xFF 0x55         0x00 0x01        0x01            angle
We can open the DEBUG_PRO_DATA macro in the CommDef.h file to print the received protocol data:

At this point, receive data of the serial port ---> parse data ---> display data, even if it is finished;
Finally, let's simulate the serial port send data. Here, in the program we give, a timer is started, and a data transmission is simulated every 2s:
static bool onUI_Timer(int id) {
    // Simulate sending serial data
    BYTE data = rand() % 200;
    sendProtocol(CMDID_ANGLE, &data, 1);

    return true;
}
The above code is actually an analog setting of the angle value. We can realize spontaneous transmission and self-reception by short-circuiting the TX and RX of the communication serial port on the screen, and we can also see that the indicator pointer rotates;
The introduction of our serial port demo program is over. Developers can compile and burn the demo program to the machine to see the effect, and then add some protocols on this basis to familiarize themselves with the entire communication process.